
A Laboratory Information Management System, or LIMS, is the operational backbone that connects sample intake, workflow management, reporting, and compliance into one controlled environment. The launch lab operations LIMS first steps process is not a software installation. It is a structured 30–60 day discovery, configuration, and verification program that determines whether your lab runs smoothly from day one or spends months fixing avoidable problems. Labs that skip the planning phase pay for it in failed integrations, confused staff, and data gaps that are expensive to correct after go-live.
What are the first steps to launch lab operations with a LIMS?
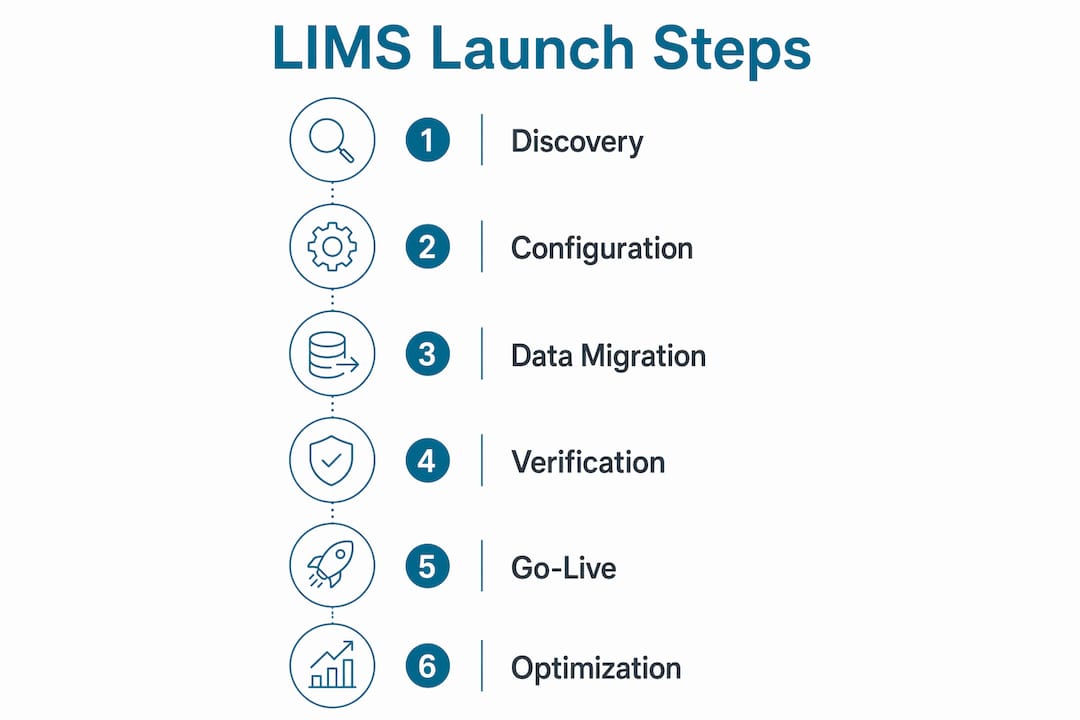
The LIMS implementation process begins with a structured discovery phase, not with software configuration. Implementation phases span discovery and documentation in days 1–14, data migration scoping in days 7–21, integration planning in days 14–30, user configuration in days 21–45, and training in days 30–60. That timeline exists for a reason. Each phase builds on the one before it, and compressing any stage creates downstream failures.
The most common mistake lab managers make is treating LIMS setup as an IT project. It is an operational project. Your workflow documentation, your instrument list, your reporting approval chain, and your billing handoffs all have to be mapped before a single configuration decision is made. The software reflects your lab. If your lab's processes are not documented clearly, the system will encode your confusion permanently.

Starting lab operations on a new LIMS without this foundation is the equivalent of building a molecular diagnostic workflow without a validated SOP. The structure matters as much as the technology.
What discovery and documentation should cover in days 1–14
The first 30 days should focus entirely on discovery without exposing staff to the new software. Premature access creates anchoring bias. Staff start forming opinions about the system before it is configured for their actual workflows, and that creates resistance that is hard to undo.
Discovery activities to complete in this phase include:
- Sample intake documentation: Map every channel through which samples arrive, including courier, patient service centers, provider drop-off, and mail-in kits. Log how each channel is currently recorded.
- Instrument and interface inventory: List every analyzer, sequencer, and instrument in the lab. Identify which ones require bidirectional interfaces and which currently export results manually.
- Result reporting and approval workflows: Document who reviews results, who approves them, what triggers a critical value alert, and how reports reach providers and patients today.
- Current system audit: Identify every spreadsheet, legacy LIS, paper log, or workaround currently in use. These are your migration targets.
- Regulatory obligations: Note any CLIA, CAP, or 21 CFR Part 11 requirements that affect how your audit trails and data retention must be configured.
Pro Tip: Shadow two or three bench-level staff members during a normal shift before interviewing them. What people do and what they say they do are often different. Observation catches the workarounds that never make it into written SOPs.
How do you scope data migration and plan integrations?
Data migration is consistently the biggest challenge in any LIMS implementation. Underestimating the quality of legacy data causes friction at every subsequent phase. The earlier you surface data problems, the more options you have for resolving them without delaying go-live.
Run your data migration scoping in parallel with discovery, starting around day 7. Follow these steps in order:
- Inventory legacy data sources. Pull a sample extract from your current LIS, spreadsheets, or paper logs. Assess completeness, formatting consistency, and duplicate records.
- Classify migration priorities. Not all historical data needs to migrate. Active patients, open orders, and reference ranges are critical. Archived results from five years ago may not be.
- Decide on automation versus manual cleansing. Structured data with consistent formatting can often be scripted for import. Inconsistent or free-text data requires manual review before migration.
- Map your integrations. List every external system your LIMS must connect to: billing platforms, EMR or EHR systems, provider portals, patient portals, and lab instruments. Assign an owner to each integration.
- Set up a staging environment. Test every integration in staging before production. Staging catches configuration errors without affecting live operations.
- Communicate with vendors early. Contact your billing vendor, EMR vendor, and instrument manufacturers before configuration begins. Ask specifically about HL7 message formats, API availability, and any known compatibility issues.
For genetic testing labs, migrating patient and genetic data requires additional care. The migration of genetic lab data involves chain-of-custody documentation, consent record handling, and data integrity verification that goes beyond standard LIS migration.
Pro Tip: Ask your LIMS vendor for a data dictionary before migration begins. Knowing exactly how the new system structures patient records, test orders, and result fields lets you map your legacy data accurately instead of guessing during import.
What does user and role configuration involve?
User configuration is where your workflow documentation becomes system architecture. Every role in your lab, from accessioning technician to medical director, needs a defined permission set that matches their actual responsibilities. Getting this wrong creates either security gaps or workflow bottlenecks.
Key activities in this phase include:
- Define role-based access levels. Separate permissions for order entry, result review, report approval, billing access, and administrative functions. No single role should have unrestricted access.
- Align workflow queues with staff responsibilities. Configure the system so that each user sees only the tasks relevant to their role. A phlebotomist does not need visibility into billing claim status.
- Build test accounts for every role. Before training begins, verify that each permission set works as intended by running test cases through the full workflow.
- Plan phased staff introduction. Hands-on training using test environments with realistic scenarios builds user confidence and reduces go-live errors. Start training no earlier than 30 days after discovery begins, once the system reflects actual lab workflows.
- Use real sample scenarios in training. Generic training exercises do not prepare staff for edge cases. Use anonymized versions of your actual test menu and order types.
Building user confidence before wide deployment is not optional. Staff who feel uncertain about the system on go-live day create workarounds, and workarounds become the new shadow system you will spend months trying to eliminate. A lab workflow design approach that centers user experience during configuration pays dividends at every stage after launch.
What verification steps are critical during LIMS go-live?
Effective LIMS go-live focuses on verification, not on-the-fly configuration. Every item on your go-live checklist should already be tested. The go-live period is for confirming that production behaves the same way staging did, not for discovering new problems.
Complete these verification steps before registering the first live sample:
- Test bidirectional instrument interfaces in production. Instrument connectivity must be confirmed under real-world message traffic, not just in staging. Interface failures that only appear under production load can disrupt critical workflows.
- Validate QC and autoverification rules. Run test cases that trigger each autoverification rule and each critical value alert. Confirm that alerts route to the correct users.
- Confirm report delivery pathways. Send test reports through every delivery channel: provider portal, patient portal, fax, and direct EMR delivery. Verify formatting and receipt confirmation.
- Test billing integration end-to-end. Submit a test claim through the full billing workflow. Confirm that charge codes, insurance information, and order data transfer correctly to your billing platform.
- Execute mock patient registration and sample processing. Run a complete end-to-end workflow using a test patient from order entry through result approval and report delivery.
- Run legacy system parallel operation. Parallel operation validates new system outputs against legacy workflows before full cutover. Keep your legacy system active for at least the first two weeks post-launch.
| Verification Area | Test Method | Pass Criteria |
|---|---|---|
| Instrument interfaces | Production message traffic | Results populate without manual intervention |
| QC and autoverification | Scripted test cases | Rules trigger correctly, alerts route accurately |
| Report delivery | Test reports via all channels | Correct format, confirmed receipt |
| Billing integration | Test claim submission | Charge data transfers without errors |
| End-to-end workflow | Mock patient registration | Full cycle completes without system errors |
Pro Tip: Assign one person as the go-live verification lead. That person owns the checklist, signs off on each item, and is the single point of contact for any issue that surfaces in the first 72 hours. Distributed accountability means nothing gets checked twice and problems fall through the gaps.
How do you optimize lab operations in the first 90 days post-launch?
The 90 days after go-live are where your LIMS investment either compounds or erodes. Labs that treat go-live as the finish line miss the optimization window that determines long-term system performance.
Post-launch activities that drive measurable improvement include:
- Monitor workflow queues daily. Track where samples stall, where result turnaround time increases, and where user error rates are highest. These patterns reveal configuration gaps that were not visible during testing.
- Collect structured user feedback at 30 days. Ask staff to document specific friction points, not general impressions. "The autoverification rule releases results I would normally hold" is actionable. "The system is confusing" is not.
- Resolve edge cases before they become workarounds. Every edge case that staff handle manually is a future shadow system. Address them in the LIMS configuration within the first 60 days.
- Validate audit trails for compliance. Audit trails under 21 CFR Part 11 must be secure, time-stamped, validated, and provide reconstructible event tracking. Confirm that your audit log captures all required user actions and that retention settings meet your regulatory obligations.
- Schedule a 90-day formal review. Bring together lab leadership, LIMS administrators, and key bench staff. Review system performance against the baseline metrics you established before go-live. Plan your next configuration update cycle based on what you find.
The LIMS implementation timeline for molecular labs rarely ends at go-live. The system grows with your test menu, your staff, and your compliance requirements. Building a review cycle into your operations from the start is what separates labs that scale from labs that stagnate.
Key takeaways
A successful LIMS launch requires structured discovery, parallel data migration scoping, rigorous go-live verification, and a committed 90-day post-launch optimization cycle.
| Point | Details |
|---|---|
| Discovery before configuration | Document all workflows, instruments, and data sources before touching system settings. |
| Parallel migration scoping | Start assessing legacy data quality by day 7 to avoid delays during configuration. |
| Role-based user setup | Define and test every permission set before training begins, using real workflow scenarios. |
| Production verification | Confirm instrument interfaces, QC rules, and report delivery in production, not just staging. |
| 90-day post-launch review | Monitor queues, collect user feedback, and validate audit trails within the first three months. |
What most LIMS launch guides get wrong
Most articles about starting lab operations with a LIMS treat the software as the hard part. In my experience, the software is the easy part. The hard part is getting a lab to stop and document what it actually does before anyone touches a configuration screen.
I have seen labs with strong technical teams rush into user setup and integration work before they finished mapping their sample intake channels. The result is a system that works perfectly for the workflows someone imagined, and fails consistently for the workflows that actually exist. Fixing that after go-live costs three times what it would have cost to get it right during discovery.
The other mistake I see repeatedly is treating training as a one-time event. Staff who receive training four weeks before go-live and then do not touch the system again until launch day forget most of what they learned. Phased exposure, with hands-on practice in a test environment using real order types, is what actually builds the muscle memory that makes go-live smooth.
The labs that launch well are not the ones with the most resources. They are the ones with a manager who treats the discovery phase as seriously as the go-live day. That discipline is what makes the difference.
— Tarek
How Labrynix supports your LIMS launch from day one
Launching a genetic testing or molecular diagnostics lab requires more than a generic LIMS. Labrynix is built specifically for the workflows that matter in precision medicine labs, including PGx reporting, accessioning, provider portals, billing visibility, and HL7 or FHIR integrations.
Labrynix gives lab managers a connected platform that supports every phase of the lab management system setup process, from initial configuration through post-launch optimization. The platform includes role-based access, audit logging, configurable workflow queues, and AI-powered insights that surface bottlenecks before they affect turnaround time. If you are planning your LIMS implementation process and want a system built for genetic and molecular lab operations, explore Labrynix to see how the platform supports labs from launch through scale.
FAQ
What is the minimum runway needed before LIMS go-live?
A practical LIMS launch plan requires a 30–60 day runway before go-live, covering discovery, data migration scoping, integration planning, user configuration, and training. Compressing this timeline increases the risk of configuration errors and failed integrations at launch.
When should staff training begin during LIMS implementation?
Training should begin no earlier than 30 days after discovery starts, once the system is configured to reflect actual lab workflows. Hands-on training in a test environment using realistic scenarios produces better outcomes than early exposure to an unconfigured system.
Why is data migration the hardest part of LIMS setup?
Legacy data quality is frequently inconsistent, incomplete, or formatted in ways that do not map cleanly to a new LIMS. Identifying these issues early in the discovery phase gives your team time to plan automation or manual cleansing before migration begins.
Should instrument interfaces be tested in staging or production?
Both, but production testing is required before go-live. Instrument connectivity must be confirmed under real-world message traffic because interface failures that only appear under production load can disrupt critical workflows.
What compliance requirements affect LIMS audit trail configuration?
Audit trails under 21 CFR Part 11 must be secure, time-stamped, validated per IQ/OQ/PQ protocols, and capable of reconstructing all user actions. These requirements must be planned as integral launch elements, not added after go-live.